Last post, I answered a reader’s question whether her small yard was large enough to create a backyard Japanese garden. Today, I would like to show an example of how one could be made from her yard. She stated that her yard was only 20 feet deep back. While this could be considered a challenge, lets give it a try.
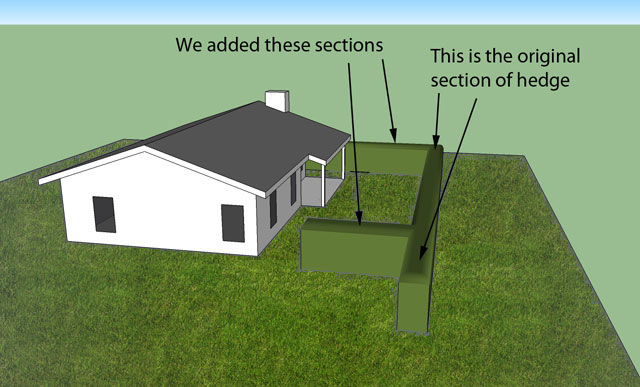
I did find out that she had a ranch style house with a covered attached patio. While this is not a model of Mary’s exact house, it is close enough for our example.

I did discover that the 20 feet back was not the total length of her yard, but it was instead 20 feet to a yew hedge that she had at the back of her yard.
Backyard Japanese garden element #1 – Enclosure
Yeah! Not only do we get a few more feet, but there is already the 1st element that I would add to her small yard. A barrier to the outside world, i.e. her neighbors! A fence or hedge would be my first addition if she didn’t already have one.
The yew hedge only runs along the back of the property line, but that does not mean we can’t add to it.
Element #2 – the Ground Plane
Now that we have the area of the garden defined by the enclosure of the hedge, we can turn are attention to the “ground plane”. Creating a beautiful and functional ground plane is the perhaps the key to creating a great garden design.
It does not matter if it is a Versailles in France, Butchart Gardens in Canada or the Adachi Museum of Art in Japan. The ground plane is the basis for all the other elements of design of those gardens.
So lets get going and begin to lay out the major sections of our narrow yard Japanese garden’s ground plane.
We will define the major areas of the garden on the ground plant. These include the:
- Patio area to be extended out from the patio under the roof of the house
- Raked Dry gravel bed
- Group paving stone set out in the yard
- Planting beds
- Grass area
- Stepping stone path
As we are starting, the paved area under the roof of the house is going to be covered with natural irregular shaped stones such flagstone. Lets take a look at from above. I left the house out as it’s roof line would block some of the details.
Stone surface patio area

The first new area we will define is an extended natural stone paved area that is an addition to the area under the cover of the house’s roof. Nothing too exciting here yet.

A dry garden (karesansui) for our backyard Japanese garden
The 2nd area we will define will be a dry garden (karesansui) area which will be raked with a simple pattern to represent water. It is also in an area that is partially under the eaves of the house making growing plants there difficult.
It’s contrasting pattern, texture and color helps to make an attractive addition to the ground plane of this design. Several different stone materials could be used to create this including crushed 1/4″ or smaller limestone, turkey granite, crushed blue stone chips, etc.
Here are a couple of examples, the first is more how it is traditionally used in Japan, while the second may be more practical to modern lifestyle.

photo credit: rocket ship via photopin cc

photo credit: sozolandscape via photopin cc
Here is how our plan could look now with the dry garden area added.

Group paving stone
The next item we will add to the ground plane design of this small backyard Japanese garden will be a paving stone set out into the yard. This paving stone would be constructed by mortaring natural stone that matches the stone used in the patio area onto a concrete slab out in the yard.
As is often done, an alternative and contrasting shaped cut stone is also used at strategic positions at the ends of the stone.
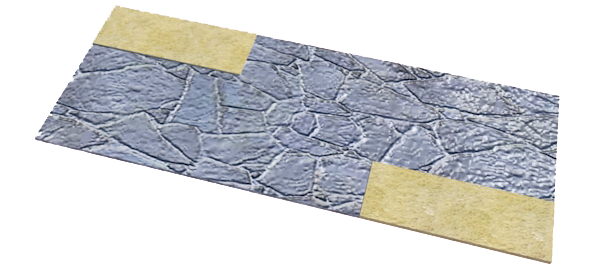
This paving stone will be used as part of a path through the garden. The repetition of the rectangle form and the natural stone from the patio area helps to make it feel like this stone is related to and part of the house even though it is out into the landscape.
By bringing part of the formal “house” out into the landscape, it helps to integrate the house and landscape into what feels like a connected whole.
Backyard Japanese garden planting beds
Now we can add the ground plane that will hold the plants in the design, the planting beds. For this area we will:
- Follow the outline of the hedges,
- Add a bermed up hill area as a focal point,
- Add a bed in front of the paving stone to bring the garden into the foreground

Turf area & Stepping stones
Now we can define the last of the ground plane areas in the small backyard Japanese garden. This one is easy, it is what is left over!
In fact it is so easy, lets go ahead and finish that path we started with the group paving stone. Lets add some stepping stones to complete a path to the side yard. Here are some examples of what this could look like winding through a dry garden:

photo credit: ell brown via photopin cc
Here is are complete ground plane for our narrow backyard Japanese garden.

In the next few upcoming posts, I will add vertical elements to the garden, including plants, a water feature and some other things. If you have not already, you can sign up to receive my posts via email as soon as they come out by filling the form out below.
