A couple of posts ago, we left off with our landscape design by creating a base plan. Lets continue the design process by starting our site assessment looking at our landscape soils.
To refresh where we left off, here is what our base map looked like.

Completing a Site Assessment
To complete a site assessment of our site, we will look at the following components of our property in depth:
- Soil,
- Water,
- Sunlight,
- Plants
If we really understand how these affect our site, we will have a much better chance of creating a Landscape design that uniquely fits our site.
Landscape Soils Assessment
Today, lets look our landscape soil, as it perhaps may be the most important.
“The soil is the great connector of our lives, the source and destination of all.” – Wendell Berry, The Unsettling of America
Soil is where plants grow. It is made up of tiny pieces of rock, which were mountains and bedrock before being broken down, and small parts of decaying plant and animal life.
Soil is where plant roots absorb nutrients which are made into branches, leaves, flowers and fruits
We will want to look at our site’s soil pH and texture.
Soil pH
The soil pH is a measure of the acidity or alkalinity of our landscape soils. Different plant nutrients are available to plants in acid soils (pH under 7.0) while in alkaline soils (pH greater then 7.0) others are more readily available.
Over a plant’s evolution they have adapted to thrive in the soils they were growing in. Most plants have a range of pH’s they can grow in, although the optimum pH range for most plants is between 5.5 and 7.0. Some like blueberry need highly acidic soil pH of and will suffer and eventually die in higher pH of say 7.5 or 8.0, while a plant like a crab apple will do fine in that higher pH soil.


So what determines your soil pH?
Let’s keep it simple. I am only a gardener for goodness sake and not some weird soil scientist from California!
Basically, soil pH comes down to the type of rock it came from. The original minerals the rock was made from do not change. If the tiny pieces of rock that make up the rock were limestone, the soil will be alkaline. If they started as granite or quartz, your soil will be more acidic.
Soil pH is also influenced by how much rainfall an area has received. Acid soils are often found in areas of high rainfall. Rain leaches calcium which is alkaline away from the soil. In areas of low rainfall, the calcium stays and makes the soil more alkaline.
So how do you determine your soil pH?
Probably the best way is to take a soil sample and send it off to a lab to be analysed. Although less accurate, you can also get a simple test kit or meter from your local garden center to find out your soil pH.
Soil Texture
Soil texture is determined by the size and type of particles that make up the soil. Why is it important?
Soil texture is the primary factor in determining how well your soil drains.
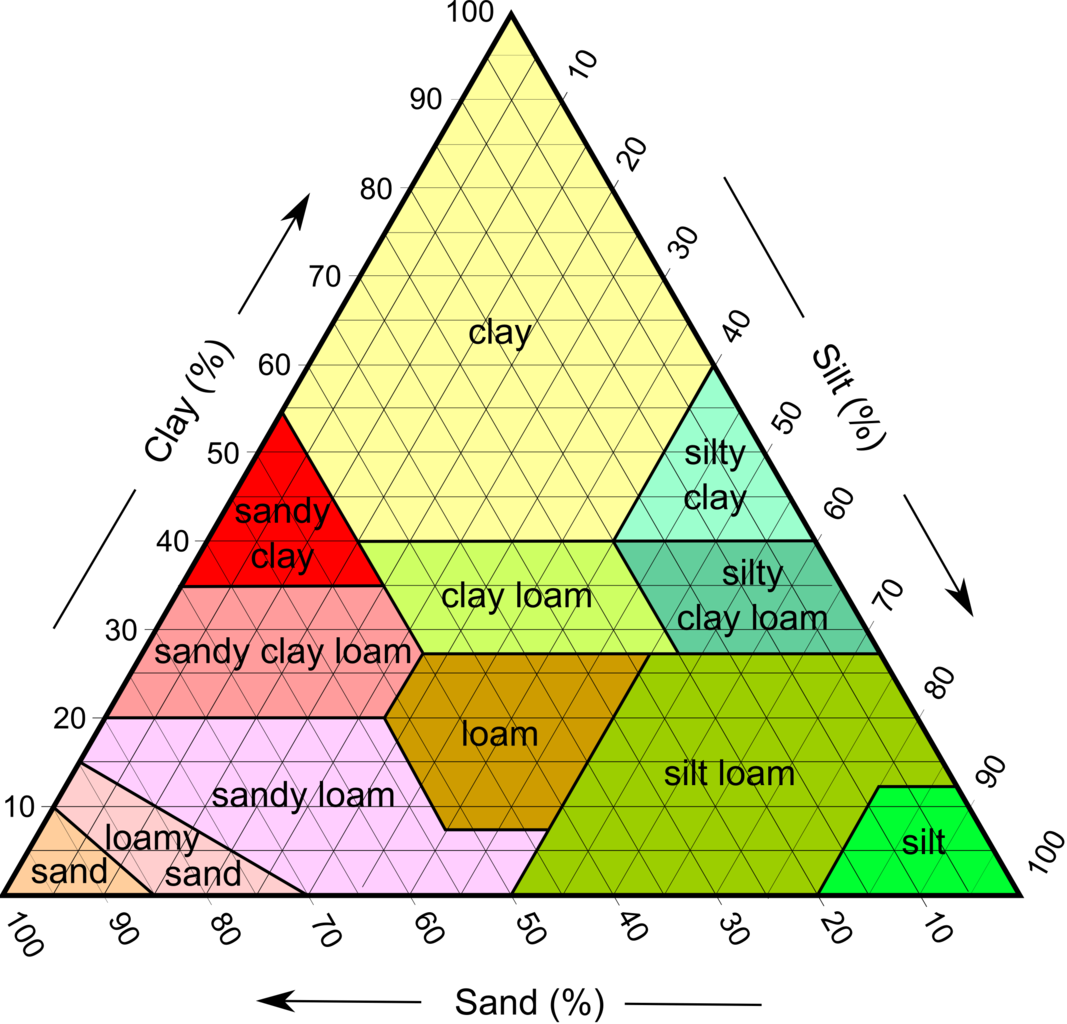
The size of these little bits of rock has quite a range, from large gravel to tiny particles of clay. We can classify these soil particles based on their size:
Sand – less than 2 mm and greater than 0.05 mm in diameter
Silt – between 0.05 mm and 0.002 mm in diameter
Clay – less than 0.002 mm in diameter
The larger the soil particle, the larger the air spaces between them. Think of a pile of rocks (large particle size), there is more space between the rocks for air. Clay (think modeling clay) on the other hand is very tiny and can pack so close together their is very little space, so a little water fills all the space.

How does this affect drainage?
The water that is close to the soil surface is held tightly to the particle. Since all the water in the clay example is close to the edge of the soil it is all held tightly.
In our rock example only a small percentage of the water between the rocks is right up against the rock and held tightly. The rest can easily drain away.
Of course, you have more than one size. It’s the percentage of the different soil particle sizes that combine to make your soil texture. If you know the percentages of clay, sand, and silt you soil is, you can use the chart below to figure your overall soil type.
How to figure your Landscape Soils Texture
Since, it’s around 9 degrees outside as I write this, let’s first take a look at our soils while sitting on our tushes in our warm house drinking some nice black coffee.
The starting place we can look for information on your soil are the NRCS (National Resources Conservation Services) soil maps. To get them you can go to the NRCS site here: http://websoilsurvey.sc.egov.usda.gov/App/HomePage.htm
Once there you can click on the Big Green button to start the Soil Survey Web App:

Here is nice 9 minute tutorial on how to use the web soil survey to find out about the soils that were on your property when the surveys were done that was done by Ecology Artisans.
If you live in a house that was part of a subdivision built during the last several decades you can assume that your builder striped off whatever topsoil you had, built your house and then proceeded to give you back just enough so you could grow some grass. PS There a few enlightened cities and counties that prohibit this practice. Does yours? Why not?
If your property had the rich and deep topsoil that the prairie plants and buffalo built over thousands of years you can assume, they sold off the rest. Don’t worry you can still buy it back in 40 lbs bags or by the truckload.
If you have undeveloped property or a lot that was developed before developers got into the habit of plundering your land, your landscape soils might be very close to the map.
Here is what my soil map from my custom made report looks like:

The numbers are the different soil types. 792B is Bowes silt loam and 325B is Dresden silt loam.
There is a lot of info in the details of these soil types (which are similar). Lets take a look at a just a few of the items I pulled out of the description of the Dresdan silt loam:
Parent material: Loamy drifts over sandy and gravelly deposits
Typical profile of the soil.
-
H1 - 0 to 7 inches: silt loam
-
H2 - 7 to 27 inches: silty clay loam
-
H3 - 27 to 32 inches: very gravelly loam
-
H4 - 32 to 60 inches: sand and gravel
Natural drainage class: Well drained
It basically says I have silt loam and silty clay loam on top of gravel and sand. Not surprisingly, this soil drains well and is very unlikely collect on the surface or upper layers of the soil. This matches my experiences so far.
Let’s go ahead and put this info on top of our base map.

Get off the computer and go play in the dirt
Now of course, we want to verify what our landscape soils are really like. This is the point where a soil test or two by a lab may prove helpful. Search for “soil tests” and your location, usually a county if you are in the US and you should get a place where you can drop off or mail in a soil sample to be tested for pH, texture and other things.
You can also do some more involved tests at home such as a Jar test at home to find out your soil texture. Here is a good source of instructions on how to perform these tests.
Since the important thing we are getting at is how well our soil drains, we can also test that directly. To do this you can dig some holes and perform a drainage test to see if the drainage is a good as it is supposed to be.
Steps to test our landscape soils drainage
1. With a shovel dig hole about 18″ deep. The hole should be at least 12 inches in diameter. The sides of the hole should be uniform and the bottom flat.
2. Fill hole with water to the top and let stand overnight or until it completely drains. This wets the soil.
3. Refill the hole to within a couple inches of the top, but don’t overflow it.
4. Put a stick across the top of the hole and use a measuring tape to mark the initial depth of the water.
5. Allow the hole to drain for at least one hour or better yet, 2 to 3 hours to get a more accurate average percolation rate.
6. Determine average drop in water level per hour.
7. The ideal soil drainage is between 1”- 3” for plants that have average drainage needs.
If the rate is less than 1” per hour, your drainage is slow, and you’ll need choose plants tolerant of wet soil. If drainage is more than 3” per hour, it’s fast and you will have to choose plants that tolerate dry soil.
We cannot hope to either understand or to manage the carbon in the atmosphere unless we understand and manage the trees and the soil too.
— Freeman Dyson
We are not done with landscape soils completely as we will take at look at soil compaction when we talk about Water when we continue our site assessment.
We will take a break next time and cover something a little bit more colorful.
Leave a Reply